As you know, unfortunately, the operating systems of the Windows family are not particularly stable in operation. They are the ones who are most susceptible to viruses or malware, as well as unexpected malfunctions, which often leads to extremely tragic consequences when the system becomes impossible to boot. And Windows 7 is no exception. Creating a Windows 7 recovery disk will help here. We will now look at how to do this in several ways.
Windows 7 boot problems
As for the reasons that can affect the performance of Windows 7, there can be a lot of them. Despite the fact that of all the operating systems of this family, the “Seven” is one of the most stable and secure, however, it is not immune from such cases.
Speaking of boot problems, they can be divided into two main categories: software failures of the OS itself and hard drive malfunctions, including system errors. Quite often, such situations are associated with, say, virus attacks, the influence of malicious codes, incorrect shutdown, HDD overheating, unexpected power outages, which can even cause physical damage to the hard drive when shorted, etc., etc.
But now we will talk about how to create a Windows 7 recovery disk. In most cases, fixing software failures helps eliminate many problems, even when automatic checkpointing is impossible (in Windows 7 this is very common and is associated with errors on hard drive or in the partition where the OS itself is installed).
Using a Windows 7 recovery disc
Now just a minute more patience. Before moving on to directly addressing the issues of creating a Windows 7 recovery disk, a few words about its use. The fact is that when loading from such a disk (or flash drive), all saved parameters, drivers, programs, etc. are not loaded from the hard drive, since the system present on it does not have boot priority.

To properly use the Windows 7 recovery disk, you need to specify in the BIOS settings that the first boot device will be a CD/DVD media or USB flash drive. This parameter is selected in the Boot Sequence (Boot Device Priority) section in the First Boot Device line.
Please note: if a flash drive is specified as the priority device, it must already be inserted into the appropriate USB port before turning on the computer.
Where to begin?
So let's get started. It’s worth saying right away that many users don’t particularly bother creating a Windows 7 recovery disk, preferring to use the original installation or recovery kit.

On the one hand, this is a fairly simple solution, but it is suitable either for installing the system from scratch, or for accessing (if there is one on the disk). The problem is that not all users know how to use it. This is where a manually created disk comes in handy, especially since using it you can restore not only the system, but also data from the hard drive.
Windows 7 recovery
There are several ways to create a boot disk. First, let's look at the standard tools of the Windows OS itself.
The first and simplest method is to use the “Control Panel”, in which the “Backup and Restore” section is selected. In this section, you need to select the line “Create a system recovery disk”, after which you will be asked to select the device as a boot tool. All that remains is to insert an empty “blank” into the drive and start the recording process.
Let us immediately note that in most cases a regular CD will be sufficient for a 32-bit system. The volume of recorded information will be about 150 MB. If you will be using a Windows 7 64-bit recovery disk, it is better to take a DVD media.
This is not the only method of accessing commands. You can also use the main “Start” menu, where in the “Maintenance” section you select access to backup and recovery or the direct command to create a boot disk for the system. You can use the recdisc command from the Run menu (Win + R). The essence does not change from this.
Creating a system image
Creating an image of the system can be no less effective. This method allows you to obtain copies of all disks and partitions necessary for the correct operation of the operating system.
In the section above, instead of creating a recovery disk, you simply select the “Create a system image” option, after which you will need to select a backup storage location (hard drive or hard drive partitions, or network location). In principle, the procedure is almost similar to what was described above.
What you need to recover your hard drive
Naturally, Windows 7 can produce in the way just discussed, but it is better (and this has been proven in practice) to use special utilities. One of the most powerful is Acronis True Image. In it you can create both a Windows 7 recovery and a backup copy of the entire hard drive and its partitions.

In this case, in the program menu you need to select the “Create archive” item, after which you can select what exactly you want to copy. There are two fields here: “The entire hard drive or individual partitions on it” and “Files and folders”. It is clear that you can make a complete copy of all the data on the hard drive, but here it is worth considering one important aspect, namely, the amount of information placed in the backup copy.
This is where problems with lack of disk space begin. For a complete image, it is better to use removable HDD hard drives connected via USB ports, and in most cases, a regular flash drive is suitable for saving individual files and folders. It all depends only on the volume of the “screw” itself (files and folders) and the volume of removable media.
Third Party Applications
A fairly simple solution to the question of how to create a Windows 7 recovery disk image can be to use popular utilities such as UltraISO, Daemon Tools and many others. As a rule, all software products of this type have at their disposal appropriate tools for working with images.

In this case, the image itself (of the system or hard drive) is first created, and then recorded on the appropriate removable storage medium.
If nothing helps during recovery
And now a few words about boot problems if the Windows 7 system recovery boot disk does not help.
The system failure could be caused by viruses, so even booting from disk will not fix the problem. The copy will still “pick up” the virus from the hard drive, because the recovery does not affect user files and folders (and viruses are disguised as them).

In this case, before recovery, it is recommended to use utilities such as Kaspersky Rescue Disc, which can load before the OS itself starts. As practice shows, they remove viruses much more effectively than stationary antiviruses, the operation of which directly depends on the state of the operating system.
In some cases, if the system has not recovered, you can try to solve the problem by using utilities to check the HDD. Among them there are also those that start even before Windows starts loading. However, using an antivirus and then a system repair disk helps very well in most cases. Checking the hard drive may only be necessary if problems are discovered that are associated with physical defects or system failures in the form of bad sectors that cannot be corrected by standard methods.
Users often experience situations when, due to the installation of a certain driver, utility, or virus infection, the OS begins to slow down terribly or does not function at all. Thanks to the program's recovery option, system files can be restored to normal. In this way, you will be able to avoid the lengthy process of fixing breakdowns. In some cases, the issue can be resolved only by delving into the BIOS system; in others, simpler tools, for example, a boot disk, will help. To understand how to restore Windows 7, spending a minimum of time, study this material to the end!
The easiest recovery option is a system rollback
Experts identify a number of methods by which the OS can be restored to its correct state. The list looks like this:
- system backup (backup);
- applying the last known known good system configuration;
- a disk with system installation files or using safe mode (non-standard mechanism);
- standard “System Restore” mechanism.
Last Known Good Configuration
This is the most basic way to restore Windows 7. To do this, you need to boot through safe mode (the computer is restarted, and at the stage of turning on the OS, press F8). The window that appears in front of you will list different download options. The “Last Known Good Configuration” section will help you by selecting it and pressing Enter.

The section is needed so that the user can boot the PC using the latest, adequately working parameters. Often, with the help of such simple manipulations, it is possible to restore driver settings and system registry data. The function helps when the OS cannot be loaded in standard mode due to incorrect changes.
Recovering from Safe Mode
First you need to go to Windows safe mode (F8 key). After waiting until the machine boots completely, go to “Start” - “Search” and look for the “System Restore” program. All that remains is to select a point and confirm the decision. We'll talk about what a restore point is later.

If the method helped, then at the last stage the computer will reboot on its own, and then restore its operation in the mode that is familiar to you.
Boot disk
The method is great for those who have an original disk with Windows 7 OS on hand. It will help to restore the system when even safe mode does not help. Let's look at the procedure:
- by pressing F8 switch to safe mode;
- select “Troubleshoot your computer” and then “System recovery options”;
- insert the disk, boot from it (read below how to do this);
- select a language, go to the “System Restore” section in the “Windows Installation” window.

After these simple manipulations, you will be taken to the section with Windows 7 recovery options, where you can return everything to its place by selecting the correct point.
Boot priority in BIOS
The boot order allows the computer to understand which device to boot the OS from. Having chosen the order, the user can boot from different media: from a flash drive, disk, over the network.
So, to change the order, you first need to go into the BIOS system. Most often, this requires pressing F2 or Del. You need to press it when a message like “Press Del (F2) to access the BIOS” appears on the screen.
On some machines, other combinations are used: Ctrl+Alt+Esc, F1, or just Esc.
Once in the BIOS, you need to go to the Boot tab. Transitions between menu items are performed using the left and right keys. The decision is confirmed by pressing the Enter key.
Next, it is important to find the Boot Device Priority item. Now all that remains is to select the order of devices by changing them by pressing the “-” and “+” buttons. Having set the necessary parameters, it is important to save the changes and leave the BIOS (Save & Exit tab).

Restoring using backup
If you have previously created a system image, then the method will be truly life-saving. Find the backup and do the following:
- connect a flash drive with backup;
- select “Recovery” in the “Control Panel” menu (opens through “Start” in safe mode);
- Restart Windows 7.
If it is impossible to boot the system, then you can use the backup only by booting through safe mode (F8) and selecting the “Restore system image” item.

When installing an image via safe mode, it is important to select the “Advanced recovery methods” options, and there find the option to use a system image. The computer will prompt you to back up, you can skip this point and just reboot. If you leave the recovery settings at their defaults, Windows will recover after a reboot.
System Recovery Options window
It doesn’t matter which method you used to restore the OS, you will go to this window. There are a number of functions here that are important to know about:
memory diagnostics Windows - by selecting this item, the computer will check the system memory for errors;
System Restore- returning Windows to a period when there were no defects;
startup recovery- analyzes defects through which the usual system boot cannot take place;
command line- the ability to delete files that prevent the system from booting;
system image recovery- allows you to resume normal operation of the OS from a previously prepared copy.
After going to “System Restore,” a new window will appear with a message stating that “System Rollback” will help fix all current problems. Click Next and select a point.

Restore point
A correctly working OS creates such points without your help, this happens every 7 days. They are also created when updating drivers or installing software components. Such points can be set manually if desired. Need to:
- save and close all files;
- go to “Start” - “Search programs and files”, where enter “Create”;
- go to “Create a restore point”;
- click “Create” in the “System Protection” window;
- describe the name of the point so that you can find it in the future.
After selecting a description to identify the point, the creation process will begin, after its completion the system will issue a corresponding notification.
Return to factory settings
If it was not possible to achieve a clear result, then you need to “reset” to the original settings. This option is used on laptops. It is very controversial, because all data on the machine will be lost. In addition, the method can be implemented if there is a hidden volume on the hard drive (provided from the factory). You can find out whether such a volume exists by clicking on the “Computer” shortcut and selecting “Management” - “Disk Management”.
To return Windows to factory settings, you need to hold down a certain key (the algorithm is different for each device model).
Here is the list of keys:
- for MSI laptops - hold down the F3 button at startup;
- Samsung - F4;
- ASUS - F9;
- Acer - Alt+F10 (hold);
- Toshiba - F8;
- HP, LG - F11;
- Dell - Ctrl+F11.

Results
Restoring Windows 7 is not difficult. One of the methods presented here will certainly help restore the system to its correct state. This is the use of the last known good configuration, recovery via safe mode, boot disk and backup. Extreme measures are to reinstall Windows again or roll back to the initial settings, but you will lose data on the disk where the OS used to be.
Let's look at how to start Windows 7 system recovery.
In the second half of 2017, Microsoft plans to officially end support for the seventh version of Windows.
In this regard, many users try to find options for solving many errors and problems on their own.
According to the latest data from the company, updates for the OS are released much less frequently, and user support is provided only in really important cases. The corporation is placing all its emphasis on improving Windows 10. Insufficient system support leads to bugs and freezes.
Often, user actions are also the reason why the OS is too slow. Installing “heavy” games, programs, rebooting RAM and hard drive are the main factors of system failure. If you experience a sudden deterioration in your computer's performance, you should restore it. After this procedure, all PC functions will be fixed.
There are three basic recovery methods:
- Using the built-in assistant;
- Using system tools (BIOS, command line and others);
- Through third party programs.
Standard utility "Recovery"
By default, each copy of Windows 7 periodically creates restore points - an archived version of the last successful PC configuration that the user can use to restore.
Each such recovery point is stored on the computer’s hard drive. To select one of them, you need to use the standard Windows utility. This option is the simplest and is suitable only if the operating system boots normally and the function of creating archived copies of the OS is not disabled on the computer.
Follow the instructions:
1. Go to the PC control panel and enter “System Restore” in the search text field;
2. In the results tab, select the window of the same name and wait for it to open;
Rice. 2 – standard utility window
3. By clicking the “Next” button, you consent to the processing of your data by the system. The recovery process will only save those files and folders that were created before the date the access point you selected was added. The RAM and hard drive configuration settings also change. Also, drivers and other software will be updated to ensure stable operation of the system. Make sure your computer is connected to the Internet;
4. When choosing a restore point, pay attention to the date it was created. The save date must correspond to the period when Windows 7 was operating normally, without failures;
5. Click on the “Show other points” checkbox to see all the objects in the window. To see which applications the rollback process will work with, select the required point and press the “Affected programs” button;
6. Once you have decided on the choice of the created backup, click “Next”;
Rice. 3 – select a restore point
7. In the new window, confirm your choice. Don’t forget to check the properties of the point and the name of the drive with which it will work (to restore the OS, the system drive C must be indicated in the corresponding column);
Using Safe Mode
After serious errors occur in Windows 7, the system may not boot normally. To resolve this problem, it is possible to start in safe mode. It can be used to boot Windows specifically for troubleshooting purposes.
This download option lacks some standard services and options. Only the basic drivers and components that are necessary for the system to operate are launched. This option is suitable if you are unable to work due to a persistent error that shuts down your computer or causes it to freeze.
In safe mode, such errors will not appear, and you will be able to remove malicious programs or perform a system rollback, as described in the previous paragraph of the article.
Follow the instructions to start Safe Mode:
- Turn on your PC. Then press the Power key again;
- Open the start menu by holding down the F8, F12 or Escape key, depending on your PC model;
- After a few seconds, the Windows 7 boot options window will appear;
Rice. 4 – system boot parameters window
- Select “Safe Mode” by pressing the up and down keys, as shown in the figure above;
- Press Enter to perform the action.
After restarting your PC, you will be taken to the Windows 7 desktop, where you can perform a restore via an access point.
Remember! In this mode, it is not possible to use a global network connection. If you need Internet access to set up normal operation of the system, in the additional settings window, select “Safe Mode with support for network components.”
Automatic troubleshooting
You can also enable the troubleshooting option through Boot Options. It allows you to reset all errors automatically. Also, users have the option to enable the last normal configuration of Windows 7. After selecting this option, the OS desktop will boot into the last known good copy of the settings.
Follow the instructions:
- When turning on the computer, launch the system menu of power-on options by holding F8;
- Select "Last Known Good Boot" and try to start Windows 7;
- If the startup attempt is unsuccessful, return to the system menu again and select “Troubleshooting”;
- The operating system will launch a utility to automatically correct all errors. After this, Windows 7 should start in its restored form.
Rice. 5 - Troubleshooting and launching a successful Windows 7 configuration
Recovery via command line
This option is suitable if there is not a single saved restore point on the computer, but you manage to start Windows 7.
Start your PC in safe mode with command line support. This will allow you to open a CMD window and work with basic commands.
Rice. 6 – select OS startup option
After turning on Windows 7, open the Run window and enter the following command in the field. It will run the line.
Rice. 7 – Run window in Windows 7
In the window that opens, type the command shown in the figure and press Enter. After a few minutes, a message indicating that the PC was restored successfully will appear. Restart it to exit Safe Mode.
Rice. 8 – fixing the system using Command Line
Recovery using a flash drive or disk
Due to fatal errors occurring in Windows 7, users are unable to start the system using Safe Mode. In this case, you can restore Windows using a boot disk or flash drive.
Bootable media is a removable device (usually a CD or flash drive) onto which an installation copy of the Windows operating system is downloaded. You can create such media on another PC using ISO Maker, Live CD, Daemon Tools and other utilities. If you still have a disk with an official copy of Windows, it can also be used to roll back the system.
Note! The versions of Windows 7 on the boot disk and on the computer must be the same. Otherwise, recovery will not be possible.
Before you start fixing the work using removable media, you should configure the component loading queue in the BIOS - the computer should load not the installed version of Windows 7, but the one located on the drive:
- Open the BIOS by pressing the F8 or F12 keys immediately after turning on the PC;
- Go to the Boot tab;
- In the window that opens, find the “Boot Priority” items - each of them means a specific boot order for PC components. Set the type of your bootable media first. In our case, recovery will be carried out from a flash drive, so in the first column “Boot Priority” we select “USB Storage”. If you are working with a disk, put the “Hard Drive” component first;
Rice. 9 – selecting the boot order of removable media in the BIOS
- Now, as a result of starting the computer, you will see the Windows installation window. Find the “System Restore” item and click on it;
Rice. 10 – recovery from bootable media
- Confirm the action again as shown in the image below:
Rice. 11 – select recovery option
- Click on the “Next” button and select an access point, as described in the first section of the article.
Rice. 12 – launch the standard utility
Using the AVZ utility
AVZ is antivirus software that quickly scans your computer for malware, incorrect settings, and Windows errors. The application is distributed free of charge and does not require installation. Suitable for use in systems of any capacity.
To perform Windows recovery in this program, just open the “File” tab in the main window. Then click on “System Restore”.
Fig. 13 – main menu in AVZ
In the window that opens, check the boxes for all system options that the program will work with. Click on the "Run" button. The list is quite extensive. We recommend that you select all items.
Doing these will increase the likelihood that Windows 7 will run smoothly after the application is terminated. Fixing your network, hard drive, search, and startup settings at the same time is the best recovery option for your operating system.
The occurrence of a problem informs the user that the system was unable to access the read procedure from the bootable media. Since the error appeared in an already installed system immediately after it was restored, we can say that its cause is a problem with the drivers.
Most likely, after the recovery procedure, the operating mode of the system disk was changed from IDE to AHCI, so the existing drivers were not suitable for booting the OS. You can solve the problem by disabling AHCI through the BIOS:
- Turn off your computer and open the BIOS menu;
- Go to the CMOS settings tab and select the SATA serial interface configuration item, as shown in the figure below;
- Press Enter and select the IDE option in the pop-up window;
- Save the settings, exit the BIOS and restart the computer.
Fig. 16 – switching SATA modes in BIOS
After turning on again, the system will complete the recovery and will work without failures.
Thematic videos:
System recovery Windows 7 and XP
This video tutorial will tell you how to perform a system restore in Windows 7 and XP, and in what cases you need a system rollback
One of the most painful questions for users is how to restore the Windows 7 system. It is this topic that I want to devote my article today. Why does Windows crash? In fact, the range of reasons is quite high: from driver errors to incorrect user operation.
Personally, I advise all users to immediately make a backup copy of their operating system, just in case. Windows has special programs for this. In this article, I will show you several ways to restore the system, for example, when the F8 key does not open a special recovery program.
Usually, in case of problems with Windows, it is enough to press F8 at the initial stage of starting the computer to launch a special recovery application. In this case, you will be presented with several options for starting the system, among which you need to select “Troubleshoot computer problems.”

After this, a window will appear in front of you where you can launch the system restore tool. For a better understanding, pay attention to this screenshot.

I would especially like to note this fact: during the installation of the Windows 7 Professional and Windows 7 Ultimate operating systems, the recovery environment partition is always created automatically and is located in the root of the drive (C:) in the Recovery folder.
If you pay attention, you will see in the Disk Management window a special, hidden partition of the hard drive. Its volume is 100 MB, and it is intended to store boot configuration files (BCD) and the system bootloader (bootmgr file).
How to find it? Simple enough, follow this route:
Computer – Management – Disk Management.
If you delete this partition, the system will not boot. So be careful.

In case F8 does not work, you need to use the Windows installation disk. In this case, before installing Windows, use the “System Restore” function.

In front of you you will see a window with system recovery.

Look carefully at the screenshot. Do you see another hidden partition of 9.02 GB? This is the system recovery partition, which contains the factory settings of my laptop. Naturally, yours has a different size.
Treat it with caution too. It is through this that you can restore Windows 7. Therefore, do not delete this partition under any circumstances.

So let's get started. Select Startup Repair. The system now identifies errors and malfunctions that prevent normal startup.
During the search process, the system will notify you of errors and offer to correct them.


System Restore will allow you to go back some time, i.e. to the previous restore point where all settings were saved.


Another great way to restore a Windows 7 system is to restore a system image.

It will restore the system even if the installation disk is missing or the hidden settings partition is deleted. This method is suitable for cases when the operating system does not load and additional boot options are not offered.
In this case, you need to do the following. After installing Windows 7, create a backup image of Windows 7 on your hard drive using the System Image Restore function. Treasure this image like the apple of your eye. Also create a Windows 7 Recovery Disk (I’ll write about this below) to use the System Image in case Additional boot options do not open.
Follow the following route:
Start – Control Panel – Backing up computer data.

Select the local drive where the system archive will be saved. It is better if it is a separate disk on which the operating system is not installed.
By default, the data archiving program selects the partition with the Windows 7 operating system. If you want, you can add Local disks for archiving, just make sure that there is enough free space for this.

Finally, click “Archive”.

The archive can be expanded and be sure to copy it to a disk or flash drive so that you have a backup option. Below I will show you clearly how to open the archive.

Use the latest system image created.


When the system is restored, all data from the local disk will disappear. Therefore, first copy important documents to disk.
When you restore the system from a disk, pay attention to the bit size of the system and the disk: a 32-bit recovery disk is for 32-bit Windows 7, and a 64-bit disk is for 64-bit Windows 7.
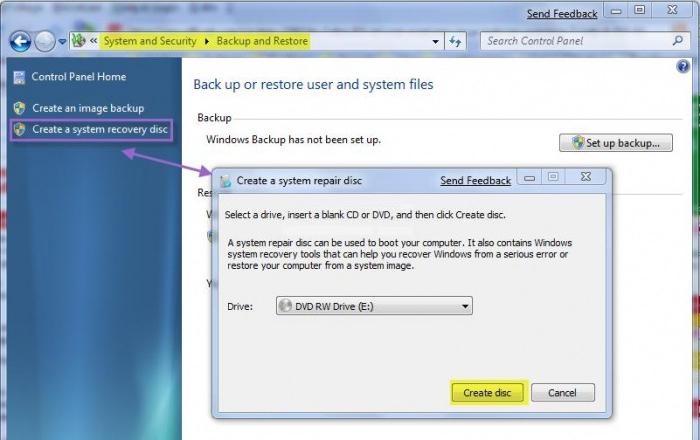
Now open Back up your computer again.

Select "Create a system repair disc", insert the DVD into the drive, and click


When you need to restore the system from a disk, simply insert it into the drive and change the boot priority in the BIOS, i.e. Select the task: “Set the computer to start from the disk in the drive,” and not from the hard drive.
Here's how to restore Windows 7 using the System Repair Disk.
- Insert the disc into the drive and restart the computer.
- Set the BIOS to boot from the drive. The System Recovery Options program will launch.
- Press Enter as soon as possible before the prompt to boot from disk disappears.


If you encounter problems, try Restoring your computer using a previously created operating system image.


And finally, here are a few tips for restoring Windows 7: memory diagnostics - checks the system memory for errors, and using the Command Line - you can delete files that prevent Windows 7 from loading.
Now you know how to restore a Windows 7 system and you can do it yourself and absolutely free! Please ask questions in the comments. I wish you all good luck and goodness!
09.02.2018
How to restore windows 7 using a disk. How to restore Windows system functionality
Using the XP distribution
Here you will need knowledge of how to restore the system through BIOS, so be prepared to work with it a little.
In the BIOS, you need to set the boot parameters so that the system first reads data from a flash drive or drive, and only then from the hard drive.
This is done in the “Advanced BIOS Features” section by rearranging the devices in the list.

After completing the described steps, the system should boot correctly. If this does not help, you will most likely have to reinstall Windows XP.
Windows 7
In the seventh version, recovery tools have become more convenient and simpler. However, you still need to learn how to handle them, which is what we will do now.
The main advantage of Windows 7 is the appearance of the so-called “Recovery Environment”. It is automatically created during system installation and stored in a hidden partition on drive C. The “Environment” is launched using the F8 key pressed when starting the computer. After pressing F8, you should see the More Boot Options window.
Tip: Try using the Last Known Good Configuration feature. The system remembers registry settings and running settings, and therefore can boot.
 If Last Known Good Configuration did not solve the problem, the next time you start it, select Troubleshoot. You will be taken to Recovery Options, where you have 5 options to choose from. In this situation, you should be interested in the first two points, as well as the last one, when you select it you will need information on how to restore the system via the command line.
Note: If you don't see the Troubleshoot option when you press F8, you will need a Windows 7 recovery disc, which you should prepare in advance.
 The easiest way. When you select this function, the system will begin searching for errors and correcting them. If the error is not found or cannot be corrected, you must proceed to point No. 2.
Here you are invited to use a checkpoint with working parameters. You need to understand that as a result, all programs installed after the date the point was created will be removed from the system.
Command line
If the previous methods did not help, select the last menu item “Recovery options”. Here you need to enter a number of commands:
- "Bootrec.exe /FixMbr."
- “Bootrec.exe /FixBoot” (bootloader recovery).
- Next - “Bootrec.exe /RebuildBcd” (to solve problems with partitions or multiple systems).
After a report appears that all operations were completed successfully, you can restart the computer.
We figured out how to restore the Windows 7 system. Let's move on to the next version of the OS from Microsoft and see what convenient recovery tools have been added by the developers.
But let’s say that your Windows 7 operating system does not turn on and does not boot, how then can you perform a recovery? To do this, we will use the second method of restoring the Windows 7 system.
System Restore via Safe Mode
A window for additional boot options appears, select any safe mode and press Enter (Enter = Select).

Right-click on My Computer and go to Properties. The screen should be black, as shown in the screenshot.

Then go to Control Panel - Home Page.

Find and go to the Recovery tab (Restore the system to an earlier state).

To restore the previously saved state of this computer, click on the Start system recovery button. You can also select Advanced recovery methods.

After this, the Restore files and settings window appears.


Selecting a checkpoint >>> Confirming disk recovery >>> Confirming a recovery point >>>

If the second system recovery method did not help you, then the third option remains - restoring the computer with the Windows 7 installation disk.
Recovering using a Windows 7 disc
Let's look at how to restore Windows 7 using an installation disk.
To do this, you need to go into the computer's BIOS and set the first priority to boot from the CD/DVD drive. Then insert the Windows 7 boot disk into the drive (drive) and restart the computer.
The first window that appears is Press any key to boot from CD or DVD. . . (please press any button to boot from CD or DVD), you must press any key within 5 seconds. There may not be such a window; if you haven’t had one, then don’t be alarmed and read on.

Windows is loading files... (Windows is loading files) you need to wait a little.

Select the desired language, time format and keyboard layout, then click Next.

The Windows 7 welcome window appears - Install, click on System Restore.

Next, the System Recovery Options window appears. We select the desired one from five options and try to revive the computer. First of all, I recommend Startup Repair - Automatically fixes problems that prevent Windows from starting.

If it doesn’t help, then click System Restore - Restore an earlier saved state of Windows).

After this, we perform all the same operations as in the first two methods for restoring the system 7. Restoring system files and parameters >>> Selecting a checkpoint >>> Confirming disk recovery >>> Confirming a recovery point >>> Starting the recovery procedure.

If the system still does not start after this, you can try System Image Restore. This method can be used if you have previously made an image of your system.

As a last resort, you can do it again.
If nothing helps you, then do it computer diagnostics, search for information on the Internet, call a computer technician at home, contact a computer repair service center, or ask your question in the comments to this article.
Let's sum it up
Today we learned a lot of useful information on how to restore a Windows 7 system in three ways: restoring using Windows, restoring through safe mode and using the Windows 7 installation disc.
Now let's watch a video tutorial on how to run System Restore.
How to do a system restore on Windows 7 | Moicom.ru
It's unpleasant, but sometimes it happens that Windows won't boot
And then the question arises: How to restore Windows XP without reinstalling the system?
I’ll say right away that this is 98% possible, BUT! My personal opinion is that if you have all the drivers and a couple of Office programs installed, then it’s better to reinstall Windows, and if not, then we’ll look at how to restore Windows without losing data in 4 ways:
Method No. 1
The easiest way to restore Windows, but personally it worked for me 2 times out of 9. But in the beginning I always use it. You need a disk with a windows distribution kit or a special one with a recovery console (reanimator, etc.) In this case, all data and programs will remain safe!!!
We boot from the disk and wait for the first menu: You are greeted by the installation program, which offers the second item: “To restore Windows XP” using the recovery console, press R = restore. (See the first picture below)
Press R, the recovery console will load and a message will appear
Which copy of Windows should I sign in to?
If you have one system, press 1 and Enter
A message will appear:
Enter administrator password
Enter the password, if there is none, just Enter
“C:\Windows” appears on the screen
Now we will enter the commands. The first thing we write fixboot. This command writes a new boot sector. To the question Do you want to write a new boot sector, enter y (Latin, which means yes) and Enter.
After the message that a new boot sector has been written, enter fixmbr. A warning will appear that there is an invalid master boot record, but even here we can safely enter y.
We wait for the message about successful recording to appear and enter the third command
chkdsk /r- checking and repairing hard disk errors. This may take a long time. After a successful message, enter exit and reboot.
I hope it worked out for you, if not, don’t despair, let’s move on!!!
Method No. 2
Restore Windows using the disk you installed it from. I emphasize, exactly from that very disc! Otherwise it may not work (it happened to me once).
So, we insert this disk, boot up and on the first menu select Windows installation (press enter), and not the recovery console (R), as in the first method.
 Then read the license agreement and on the second menu, if you have Windows Xp installed, the installation program will offer to restore it. Agree with this by pressing the R key. The following procedure resembles a normal system installation. Also enter the license key, select the time zone, etc. This is similar in time to installing a new system, but all drivers, data and programs will remain intact. You have restored Windows XP .
You do not have the disk from which your Windows was installed, then
How to restore windows XP Method No. 3
This method helps restore Windows XP if System Restore has not been disabled. If you don’t know whether it was turned on, you can see by booting from any Live CD (for those who don’t know, these are disks that allow you to boot a computer without or with non-working Windows, and calmly move and copy files - you can’t go on without it) . After loading (it takes a long time to load - 3-5 minutes) we have working Linux on our computer. We launch Midnight Commander (similar to a regular total commander) and go to the /win folder, in it we see the usual disks of our computer. Go to C:\System Volume Information. The idea of the method- replace the registry files with the latest backup from this folder. To do this, we find in it the most recently created folder of the form PR0 (you may have another one). There should be a snapshot folder in it - it contains a copy of the registry. Find REGISTRY_MACHINE_SYSTEM there and copy it to WINDOWS\system32\config. Rename REGISTRY_MACHINE_SYSTEM to system. That's it, Windows XP has been restored! Reboot and try. If it doesn’t help, then we do the same with the remaining registry branches from the snapshot folder.
But if some “bad” person disabled the system restore function, then what? Then we do this (I succeeded - it was too tedious to reinstall a bunch of programs and look for firewood for the old box, but I only did it once).
Method No. 4
Again you need a LiveCD and play with the registry. The fact is that there is a folder C:\WINDOWS\repair where a clean copy of the registry is stored. Here you need to extract the registry files from it into the config folder, but first copy the entire registry from WINDOWS\system32\config to some folder, for example C:\Kopy. Then we copy everything from the C:\WINDOWS\repair folder and, if necessary, replace it into the WINDOWS\system32\config folder. At this point I rebooted (I recommend you do the same) and Windows was already working for me. But almost all programs were not installed. Again we boot from the LiveCD and copy from our saved registry (folder C:\Kopy) to the WINDOWS\system32\config folder files only, I don’t remember the names exactly, but there is software there. After rebooting I got a fully working Windows
