Any of us can accidentally delete a file from our computer, or press the format button on our hard drive unknowingly. Both situations lead to the fact that the necessary data will be deleted from the Windows 7 computer. It is a mistake to think that it is impossible to recover deleted files on Windows 7. There is a special program for this, Any Data Recovery.
Recover lost and deleted files in Windows 7
The user may find himself in various situations when he needs recover deleted files from computer. For example, while surfing the Internet, you can accidentally catch a virus that can partially damage some documents, photos or music on your computer. The stupidest situation is to delete a file yourself and then empty the trash. This happens, and very often - I’ve encountered it myself more than once. Perhaps the most unpleasant incident can be called a hardware failure of the hard drive, which fails at the most inopportune moment. In such situations, users usually panic because they believe that deleted files on Windows 7 can no longer be recovered and are lost forever. The same can be said about formatting your hard drive.
You need to understand that deleting files does not mean that you have lost access to the data completely and irrevocably. The deleted file is only excluded from the directory, but the information on it is not reset.
How to recover deleted photos on your computer
Most often, people are looking for a way to recover deleted photos on their computer. If some files can still be recreated somehow, then with photographs it is completely different. For users, this is a great memory of various events, memories, etc. With help you can recover not only deleted photos, but also files of other types.
How to recover files on Windows 7 for free
Any Data Recovery program offers a free way to recover data on Windows 7. The list of supported files includes: images and photos, audio files, videos, word/excel/pdf documents, emails, etc. The utility interface is very simple and intuitive, so you can recover lost data even the most advanced PC user can handle the data.
Instructions
1. Download Any Data Recovery from the official website and install it on your computer (Please note that Any Data Recovery is available not only on Windows, but also on Mac).
2. Launch Any Data Recovery. In the window that opens, select what type of files we want to recover. Click on the “Next” button.

4. The program will begin scanning the drive you selected. It will take some time.

5. When the scan is completed, you will see a list of files. To select the ones you want to restore, use the preview function. The “Deep scan” function involves a deeper scan.

6. Mark the required files and click on the “Recover” button. The files will be restored to the location you specified.
It is possible to recover deleted files for free Windows 7, not only that, even the software supports other models, for example, Windows 10/Windows 8.1/8/7/Vista/XP etc. In addition, Any Data Recovery is a useful tool with a user-friendly interface that is significantly superior in quality to its analogues. You don't need any special knowledge. All you need to do is download this free program, install it (it won't take much time) and start using it. You should make sure that everything is configured correctly so that you never accidentally lose important data. Overall, this is a useful program with many interesting features.
How to restore Windows 7 system on the laptop, when loading, a black screen appears, the recovery environment does not work, I deleted all the hidden partitions, there is no original disk. I spent a lot of time, tell me what to do now, or at least how to insure myself against such situations in the future, preferably without using paid data backup programs. Ilya.
How to restore Windows 7 system
Unfortunately, there are many reasons for this problem, ranging from incorrectly written drivers, harmful effects of a virus, file system errors and ending with our erroneous actions when working with a computer. There is no need to be afraid of such problems, you need to learn how to deal with them effectively.
Let's think how to restore windows 7 system, and we will also insure ourselves in the future against possible troubles using backup and recovery tools built into the operating system. We will learn how to restore Windows 7 without using third-party backup programs, even when System Recovery Options do not load and the F-8 button is useless.
- Friends, if our article does not help you, then check out others on this topic, for example: in it you will learn how to restore a non-bootable system using various command line utilities, the first is Bootrec.exe with the commands /FixMbr and /FixBoot or the utility bootsect /NT60 SYS, as well as Bootrec.exe with the /RebuildBcd parameter, these utilities can be launched from the recovery environment or from the Windows 7 recovery disk. Another article will teach you how to restore a damaged or deleted bootloader bootmgr. The article will show you how to restore your operating system when system recovery is disabled and much more.
- If Windows 7 freezes on boot or suddenly reboots, or may suddenly show a blue screen with an error, then all these problems may be due to numerous file system errors. How to fix the situation even when the operating system does not boot due to these errors is written in this article.
- Well, eight articles from the section will give you a detailed understanding of all the built-in recovery tools in Windows 7: restore points, previous versions of files, creating a system image and a recovery disk, and so on. So, let's begin.
Windows 7 has quite a powerful and good tool in its arsenal -> Recovery environment, which is created automatically when installing Windows 7 in a hidden partition and contains five other tools that solve numerous problems and problems.
- Note: If you learn how to use Windows 7 recovery tools correctly, and this is not difficult, then you can do without additional and paid data backup programs.
You can launch the recovery tool by pressing the F-8 button on the keyboard immediately after starting the computer. After this, the menu Additional boot options will open in front of you: Troubleshoot your computer, then Safe Mode, Safe Mode with loading network drivers, etc.

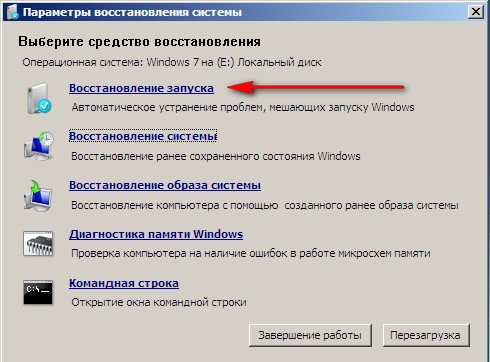
The first thing to do is apply Startup recovery(Automatically fix problems that prevent Windows from starting)

Required digression: After pressing the F-8 button when booting the computer, you may not have the > item, but only Safe Mode and so on, the question arises why.
When installing Windows 7, a recovery environment partition is created automatically and is located in the root of the drive (C:) in the Recovery folder. You can also see in the Disk Management window - a separate, hidden partition of the hard drive, its volume is only 100 MB, it is used to store boot configuration files (BCD) and the system bootloader (bootmgr file).
You can see it under Computer->Management->Disk Management. Under no circumstances should you delete this partition (many people delete it out of ignorance), otherwise you will not be able to start the recovery environment, that is, the item Troubleshooting your computer you won’t, and in more severe cases you simply won’t boot the system.

In the lower screenshot you can see another hidden partition, with a capacity of 9.02 GB, this is a hidden recovery partition with factory settings on my laptop, yours may be larger or smaller. It’s also better not to delete it; if necessary, you can always restore Windows 7 from it.

What should you do if you do not have a partition with a recovery environment and when you press the F-8 button in the Additional boot options menu, the Troubleshooting computer option does not appear? How then to restore the Windows 7 system??
An installation disk with the Windows 7 operating system can help here. You can run the recovery tool by booting from the original Windows 7 installation disk by selecting the item at the very beginning System Restore. If you don’t have an installation disk, then you can use it (you can make it in any running Windows 7) in five minutes, then you can also boot from it and do the same.


So we finally got to the System Recovery Options, either using the F-8 button and the Troubleshooting item, or the Windows 7 installation disk or the Windows 7 Recovery Disk.
In the System Restore Tools Selection menu, select the first one:
Startup recovery-> there will be an analysis of faults that interfere with the normal loading of Windows 7 and their further correction for the normal loading and functioning of the operating system. During the process, we may be warned that problems have been detected in the boot parameters, click Fix and restart.


System Restore->using this function, we can, if we have it enabled, roll back to the time when our Windows 7 worked and loaded perfectly, everything is simple here.


->I personally use this tool; if used skillfully, it can replace paid data backup programs. If you are interested, read on.

What's good about it? It will help when you don't have the original Windows 7 installation disk and you've deleted the hidden partition with your laptop's factory settings, but that's not all.
Sometimes there are situations when, for various reasons or due to the actions of a virus, you will not be able to load the operating system at all, or many people ask How to restore Windows 7 system even if the menu with Additional boot options is also unavailable. Should I reinstall the operating system again?
Therefore, immediately after installing Windows 7 on your laptop or computer, we create using this function-> Restoring a system image, an archived image of our Windows 7 on the hard drive, we take care of it. It is imperative to create a Windows 7 Recovery Disk (read below), it will help you use the System Image if the Advanced Boot Options menu does not load.
Let's go to Start -> Control Panel->Archiving computer data.

Choose Creating a system image

Next, select Local disk on which we will store the system archive. In my case, Local disk (E:), if you have several hard drives in the system unit, then of course it is better to place the backup on the hard drive where the operating system is not installed.


Note: You may notice that I have two operating systems installed on my laptop, so the archiving program selected two Local disks.

Click Archive and the process of creating an archive with our Windows 7 will begin.
Created, it will look like this.

Now, if necessary, you can deploy the archive with Windows 7 to your computer in 20-30 minutes. It would be better if you additionally copy the archive with the system onto a portable hard drive, this will doubly protect you.
Let's imagine that we can't start Windows 7 and deploy the backup we created, let's do it together.
Let's launch Windows 7 Recovery Tool, by pressing the F-8 button on the keyboard immediately after starting the computer. The Advanced boot options menu opens, select Troubleshoot your computer.

Restoring a system image

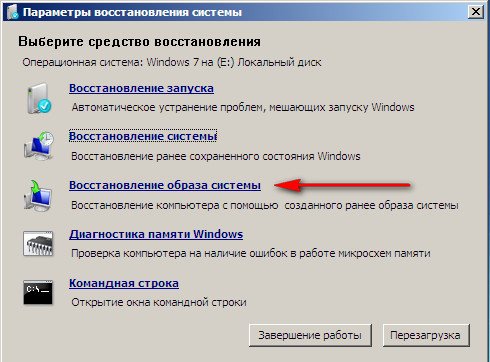
Use the latest available system image


Of course, all our data on the Local Disk, where the operating system is now being restored, will be deleted, so you can first boot from any Live CD and copy what you need.
How else can you restore your Windows 7 system? Of course, using the Windows 7 Recovery Disk. Let's create Recovery disk, which can be used to boot the computer, it will contain recovery tools that can be used to repair Windows 7 boot problems, as well as restore the operating system from the backup copy that we created in advance.
Important: The bitness of the system is important for the recovery disk, you can use a 32-bit recovery disk for any 32-bit Windows 7, and a 64-bit recovery disk for any 64-bit Windows 7.
Let's go again Backing up computer data
Create a system repair disk, insert the DVD into the drive, press

Create disk


When the Windows 7 Bootable Recovery Disk is ready, put it in a safe place.
To restore Windows 7 from a Recovery Disk, you basically don’t need any working operating system at all. You will only need to change the boot priority to the drive in the BIOS of your computer, insert the recovery disk into it and restore your Windows 7 using the archive. Many here can draw an analogy with data backup programs and this is correct, they work on the same principle, only Of course, their functionality is more convenient.
- If you don’t know how to change the boot priority in the BIOS, read our articles and
Recovering Windows 7 from a Recovery Disk. I show you how to do it. Let's say we're in trouble, we can't start Windows 7, when we press F-8 on the keyboard immediately after starting the computer, nothing happens. We cannot get to the menu with Additional boot options and an error message is displayed. In this case, the system archive on the hard drive is not available to us. This is exactly the kind of trouble that happened to our reader Ilya, who wrote us a letter asking for help.
In this situation, many people reinstall Windows 7 from scratch, but not you and me, because we have System Recovery Disk.
We insert it into the drive and reboot, set the BIOS to boot from the drive, as I said, the disk is bootable, the System Recovery Options program starts.
Press Enter until the prompt to boot from the disk disappears.
Restoring system files in Windows 7 or Windows 8/8.1 is an interesting topic. Especially if the operating system starts to fail, but we don’t have a recovery image and we forgot to turn on system protection so that recovery points can be created. In this case, we will not be able to restore the system from the image, we will not be able to roll back Windows to the created restore point, and we are also too lazy to reinstall the system, since this will take the whole day. And right here we have another chance to return Windows to normal - try to restore system files. In this article I will try to fully cover the topic so that we can revive our computer in any situation.
1. Recovering system files on a busy system
If our computer somehow turns on, then we do the following. (if it does not turn on, see section 2 of this article)
Open the Start menu. In the search field we write “Com”. On the element " Command line"Right-click and select " Run as administrator»

In the command line that opens we write
sfc /scannow
We wait a little
If your system is ok, you will see the following image

If your Windows was broken, you will see the following

System files were successfully restored. We reboot and immediately turn on system protection to create restore points so that next time we can simply roll back the state of the computer to a couple of days ago and that’s it.
It happens that when scanning the system, the sfc.exe utility found damaged files, but could not fix them. In this case, I would restore system files in Safe Mode. If the same thing happens in safe mode, read the last paragraph 4 of this article.
If your computer does not boot at all, as discussed at the very beginning of the article, then read the next paragraph.
If our computer does not want to boot at all, then we use the recovery environment. You can load into it:
- Pressed when turning on the computer F8 repeatedly
- Booting from a boot (installation) disk or flash drive
The first option will work if we have a boot partition that the system created when partitioning the disk when we installed the system. Boot partition size:
- Windows 7 - 100 MB.
- Windows 8 - 350 MB.
In any case, try pressing F8 several times during boot. A window should appear with additional download options. Choose Troubleshooting computer problems.
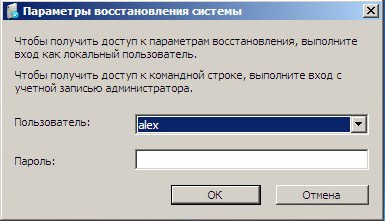
In the next window, select the keyboard input method. Select the language in which you have set the administrator password (if there is no password, you can immediately click Next >).
Select a user with administrative rights and enter a password if you have one. If there is no password, just click OK.
Select the command line.
If you are unable to enter the recovery environment using the F8 key, you will need to boot from the installation (bootable) flash drive or disk. You can boot from disk in the same way. Only in this case you need to put the DVD-RW (optical disc reader) first in the boot priority.
I like to boot from removable media using the boot menu. On ASUS motherboards it is usually also called by the key F8.
After booting from a flash drive or disk, I saw the following picture. I choose Windows Setup- Windows installation.
We wait until all installed Windows are found.
We choose the one that does not turn on for us. And here CAREFULLY! We remember the letter that the recovery environment assigned to your system (in the Folder column). I have this D.
Select Command Line.
Enter the command
sfc /scannow /offbootdir=D:\ /offwindir=D:\windows
Instead of D, you substitute your letter. Press Enter and wait for the scan to complete
The virtual machine from which the screenshot above was taken had a blue screen, so I was not surprised that system files were found and restored.
3. How to find out the drive letter with Windows installed
If you succeed using the key F8 call up the “Advanced boot options” window and select “Troubleshoot computer problems”, then we need to find out the drive letter where Windows is installed that was assigned by the recovery environment. This can be done in two ways
1. Call the notepad with the command
Open menu in notepad File and choose Open…
Left click Computer and in front of you there will be disks with letters.
You can go to the disk and make sure what and where.
2. Use the utility DISKPART
On the command line enter:
diskpart- call the utility for working with disks.
list disk- look through the list of disks.
select disk- I select the hard drive I need.
detail disk- I call up information about this disk.
4. For Windows 8/8.1
If the sfc utility was unable to restore damaged system files, then you need to try to restore the storage of these system files. The place where copies of working system files should be located. As I understand it, it is located at C:\Windows\WinSxS. That is, we must first fix the file storage, and then use the “SFC / Scannow” command to restore Windows system files.
4.1. Recovering storage using Windows Update
1. Launch Windows PowerShell with administrator rights. To do this, open the Start menu or home screen and click on the “Search” icon. In the search box we write “PowerShell”. Right-click on “Windows PowerShell” and select “Run as administrator” or “Run as administrator”.
2. In the window that opens, write
Dism /Online /Cleanup-Image /RestoreHealth
and wait. If the storage is intact or it was restored using Windows Update, you will see the following picture.

If Image Health State: Healthy - everything is fine. Reboot the computer and try SFC /SCANNOW again.
4.2. Restoring storage using an image
If we have problems with Windows Update, then this method will do.
1. Download the original Windows 8/8.1 image of the same bit size as your system. How to find out the bit depth of the installed system - .
2. Connect or mount the downloaded image. Right-click on the image and select “Connect” or “Mount”.

3. In the command line with administrator rights, we look at what editions there are in the image with the command
Dism /Get-WimInfo /WimFile:F:\sources\install.wim
I have 2 editions in my image. It’s hard to understand which one I need based on these distinctive signs. Let's use the first one. If it doesn’t work, the second one.
4. Launch Windows PowerShell with administrator rights and set the command
Repair-WindowsImage -Online -RestoreHealth -Source F:\sources\install.wim:1
where F is the drive letter to which we connected the image, 1 is the Windows edition number in the image.
5. Recovering system files manually
If using the sfc utility it was not possible to recover damaged files, you need to try to do it manually. In this case, you need to additionally run the command
findstr /c:"" %windir%\Logs\CBS\CBS.log >"%userprofile%\Desktop\sfcdetails.txt"
Findstr/c: ""%Windir%\Logs\CBS\cbs.log>sfcdetails.txt
and carefully study the file sfcdetails.txt on your desktop or %windir%\Logs\CBS\.
It should be something similar to the picture below.
After the name of the damaged file is known (Accessibility.dll), we look for it on another computer with the same system as yours. If this is not an option, then I would download the original Windows image and install it on the virtual machine. I found the file I needed and copied it to a bootable or installation flash drive. Then, from this installation flash drive, I booted into the recovery environment and launched the command line. From the command line I would open notepad. I opened the menu File > Open - and now I have an almost full-fledged explorer. We copy and replace the working file from the flash drive, reboot and everything should work.
If the option of installing a virtual machine does not suit you, then you can include the install.wim file in the folder. Then go to this folder and copy the necessary files.
1. Create a folder. For example, “Win8.1Pro” in the root of drive D.
2. Copy the install.wim file to the root of drive D.
3. Mount the install.wim file into the created folder.
Dism /Mount-Wim /Index:1 /WimFile:D:\install.wim /MountDir:D:\Win8.1Pro
Go to the created folder and copy the necessary files.

Disable the image
Dism /Unmount-Wim /MountDir:D:\Win8.1Pro /Discard
- Hello admin, answer the question, how to recover deleted files and preferably a free program? It so happened that I accidentally deleted a folder with files that I really needed from my computer (from my desktop), and I emptied the recycle bin and now I can’t restore my files in any way. I tried several free data recovery programs, but they recovered almost nothing for me! All this looks like a simple deception, but I just lost time. They also write a lot on the Internet about the DMDE program, although they say that it is one of the best for recovering deleted files and is easy to use, but unfortunately I could not figure it out without your help; when restoring, an error constantly appears: Free Edition restores up to 4000 files from the current panel only. It would be great if you could give examples of file recovery using this program and help me understand it.
- Hi all. I accidentally formatted an entire partition of my hard drive with all the files and then only realized that the partition I had formatted was not the one I needed, naturally all the files were gone. Is it possible recover deleted files and what program should I use? I tried to use free data recovery utilities myself, but nothing worked. I want to try to use a paid program, but I just don’t know which one to choose and again I doubt whether it will help, most likely they will scam me out of money and that’s it. I read your article and now I’m thinking about stopping at it.
- Please advise, the computer froze and I had to turn it off emergencyly. After turning it on, I discovered that all the partitions (F:), (H:), (J:) on the second terabyte hard drive were gone. In Disk Management, the entire hard drive is defined as unallocated space. What should I do now, restore the entire partition or restore only the necessary folders with files? Please recommend some programs.
How to recover deleted files
Hello friends, in this article we will recover deleted files using the free DMDE program, but it is not the only one of its kind, there are also (separate articles have been published) paid ones, R-Studio, .I will answer the third letter as follows: (read a separate article), but please note, the site has very detailed articles on the topic of restoring deleted partitions, for example - “How to recover a deleted hard drive partition” or “Recovering a lost partition using a program”, and also programs.
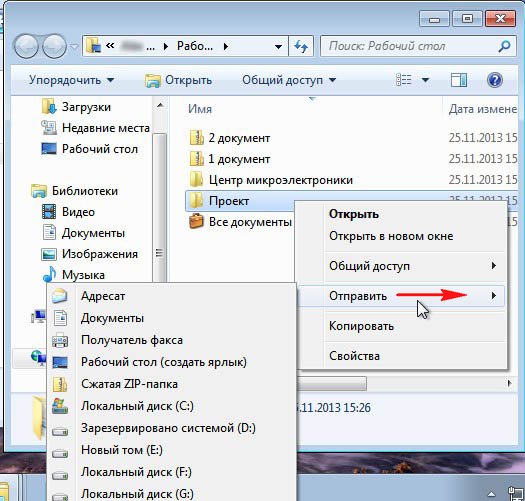
The work we have ahead of us will be long and interesting, but before that I want to cheer you up and tell you one funny incident that happened at our work. A computer was brought to our organization on which a folder called “Project” was accidentally deleted from the desktop and urgently needed to be restored. Of course, important files should always be copied to at least a flash drive, but this was not done. The computer belonged to an engineer from a friendly organization and in this folder there were important documents that he had been working on for a month, the basket was empty. The worst thing is that the employee did not remember when the folder was deleted, maybe it happened even yesterday, but this morning until lunchtime he worked in the operating system, copied various files and could have completely erased the deleted folder.
Several specialists before us tried to search for the missing folder using a special program and it was found, but the files in it could not be opened. In short, everything was tried and while people were trying to work magic on unreadable files in the Hex editor, I noticed that system recovery was enabled in the Windows 7 operating system and it worked great. Going to the C:\Users\Gocha folder, I right-clicked on the "Desktop" folder and selected "Properties"
and selected “Previous versions of files”, naturally several “Desktop” folders appeared to choose from, one version of the folder was created today by going to this folder

I discovered that it was missing - the “Project” folder, all I had to do was copy it to a flash drive and take it to my neighbors’ system administrators so they wouldn’t have to worry about it.
This is how friends also happen, and even very experienced people can forget about the basics. So if you come across a similar case, first remember about simple file recovery tools and the first thing you pay attention to is " " and " ", do not forget about them.
In the life of any person there are situations when the necessary files are deleted from the hard drive and he naturally urgently needs to restore them. My advice to you is that if the files are extremely important, for example, a sensible (and not as before) plan for the economic development of Russia for the next 15 years, then turn off the computer (preferably emergency), grab the system unit and go to a data recovery service. It will be much easier for a professional to recover your files if no recovery attempts have been made by a non-professional before.
If you decide to recover deleted files yourself, then the first rule is not to restore them to the same hard drive where they were located. The ideal option is to connect your hard drive to another system unit and with another operating system on which data recovery programs are installed and restore files to another hard drive. If there is no other computer, restore deleted files to a portable hard drive or flash drive, or you can use these.
What programs can I use to recover deleted files?
The overwhelming number of users believe that there are a lot of such programs and all of them can really help you get back files accidentally deleted by the recycle bin or restore data on your hard drive after formatting it.
So, friends, I want to express to you my opinion, based on a little experience. There are so many programs that can really help in trouble that you can count them on the fingers of one hand, and if these programs don’t help you, then you definitely can’t do without specialists.
We will recover files for free using the following programs: DMDE, Recuva and the relatively recently introduced R.saver, and we will also recover files using paid programs EasyRecovery, GetDataBack for NTFS and R-Studio. How to recover deleted files using DMDE DMDE is a free program for searching and recovering deleted files on hard drives and flash drives, it can also recover deleted partitions on a hard drive, it works without installation, you can carry it with you on a flash drive. The program has paid and free versions, but I can say that for home needs the capabilities of the free version are quite sufficient, now you will see everything for yourself.
And here is the official website of the DMDE program. Download the program, click GUI for Windows,

DMDE works without installation and is downloaded in an archive, unzip it and run the dmde.exe file. The DMDE program has detailed help on working with the program, be sure to read it. Attention! We work and don’t miss anything, I’ll give three examples of recovering deleted files, the first is very simple, so to speak, for warming up, the second is more complicated, and the third is quite difficult, but we can handle it!
Example of recovering deleted files No. 1
My system has two hard drives, the first is a Maxtor with a capacity of 250 GB with my operating system and the second Samsung hard drive belongs to my friend, the capacity is 120 GB, this disk contains two partitions, the first is (F:) with the operating system installed and the second partition under the letter (G:),

There were folders with files on it, and most importantly a folder called “Collection”, it contained films, photographs, documents. So, all the folders were accidentally deleted past the trash can. All this needs to be restored, especially the "Collection" folder

Immediately after launch, the DMDE program asks on which hard drive to restore the files. Select the second Samsung hard drive with the left mouse, then Logical Disks/Volumes on the right, a window appears in which we must select a drive letter. The drive we need is under the letter (G:), select it and click OK.


The DMDE program uses a special algorithm to search for deleted files and, in simple cases, is able to recover such files on the fly without an in-depth search. In this program window, double-click the left mouse on the section (G:) and go into it.

Double-click the left mouse to go to the section (All found + reconstruction),

There is a virtual reconstruction of the file system or, in simple words, a quick search for deleted files.

That's all, our files along with the "Collection" folder were found and we did without an in-depth search (which we will use in the next more complex case).

The program found the folders, but now you also need to restore them, check the box for the desired folder and right-click on it, in the menu that appears click “Restore object”

We select in Explorer which folder we will restore deleted files into. I advise you not to save files to the drive from which you are restoring files, in our case (G:), it is better to save the data to a portable USB hard drive, having first created a folder on it. In my case there are not many files and I will save them directly to the desktop. OK.

And the error appears: "Free Edition recovers up to 4000 files from the current panel only"

All this is due to the fact that we are using the free version of the program and we will not be able to restore a folder or several folders with files at once, but it will be possible to restore all files in a folder. To restore, we need to enter any folder and check all the files. We enter the “Collection” folder and check all the files needed for recovery, right-click and select Recover files

In the Explorer window, select a location to save the recovered files, for example, directly to the desktop.
File recovery process


All files were perfectly restored, movies are played, photos are opened, documents are read.


Now let's look at the second example, a more complex method of recovering files.
Example of recovering deleted files No. 2
To check the program's capabilities again. On the familiar Samsung hard drive, I myself deleted all the files from the drive (G:) and then formatted it, copied a large group of files onto it and formatted it again.

We will search for the same folders with videos, photos and the “Collection” folder. Let's launch our DMDE program. The program asks us which hard drive to restore files on. Select the second Samsung hard drive with the left mouse, then Logical Disks/Volumes on the right, a window appears in which we must select a drive letter. The drive we need is under the letter (G:), select it and click OK.
We try a quick search, click on the new volume (G:) twice with the left mouse.

Virtual file system reconstruction.

A quick search yielded nothing; no files reminiscent of the installed operating system were found. Therefore, we return to the “Disk Partitions” window,

select our “New Volume (G:)” and click the “Search NTFS” button
Attention: If your storage media is formatted in the FAT32 file system, then select the "Search FAT" button


The search for deleted files begins, lasting 20 minutes. In difficult cases, you need to wait until 100 percent of the scan is completed. Pay attention to the "Matches" column; it can be used to assess the quality of file recovery on the found volume. Double-click with the left mouse on the first section,


Click on the section (All found + reconstruction).


MFT reading error - ignore it.


As you can see, the advanced search has borne fruit, but the files found by the program are absolutely not the same. These files were located on this hard drive several years ago and at the moment we do not need them at all. I try to repeat the scan again, but the result is the same.

Friends, I have been using this program for a long time and in one case out of five you will be able to recover files after formatting, we were just unlucky today.
And finally, the third example, very difficult to restore, and the program partially coped with it.
Example of recovering deleted files No. 3
From our Samsung hard drive I deleted all files, then deleted all partitions, this is (F:) with the installed operating system and the second partition under the letter (G:). Then I formatted the hard drive and created one large new volume on it (H:) and copied a large group of files to it, then deleted them, and finally deleted the created new volume (H:). Of course, after this, it will be difficult for any program specializing in data recovery to recover files.

Note: under such circumstances, we can try to recover the deleted partitions entirely along with the files, but we will describe this process in the next article.
We need to restore a folder called “Collection” located on the disk (G:) before formatting. And I also want to restore a folder called “Archive” that was on the desktop, on the drive F:\Users\users\Desktop. Let me remind you that now, instead of our sections (F:) and (G:), there is simply unallocated space.
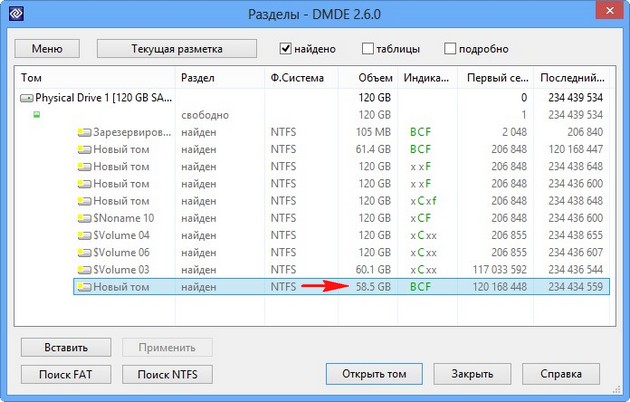
We launch the DMDE program, there are currently no partitions on the Samsung hard drive, so check the “Physical devices” item, select our Samsung hard drive and click OK.

There is a quick search for deleted partitions,

As you can see, the last found partition fits the size of the disk (F:) with the operating system, let's first try to look for the remote "Archive" folder on it. Double-click on it with the left mouse.
Click on the section (All found + reconstruction).

Virtual file system reconstruction.

The program did not find any files on the fly, go back, click on the “Disk Partitions” button,

select our found “New Volume” and launch a full search for deleted files, click the “NTFS Search” button


As I already said, the "Matches" column can be used to assess the quality of file recovery on the found volume. Let's wait for 100 percent scanning. The full scan took 30 minutes. Let's go to the first section

(All found + reconstruction)


And we see all the operating system files,

Go to the desktop C:\Users\users\Desktop


And we restore our “Archive” folder with all the files in it.

One inconvenient thing about the free version is that it is impossible to restore the entire folder at once; you have to go into the folders and select all the files, then restore them as a group.
Then I scanned all the found volumes and found many interesting files that ever existed on this hard drive, but unfortunately I could not find the “Collection” folder.
As you can see, our program has almost coped with the rather difficult case of recovering deleted files, and even after full formatting. So, in my opinion, the program deserves to be in your service.
If interested, read our next article “How to recover deleted files using the free program “Recuva” and “R.saver”
Often, novice users delete necessary data from a laptop or accidentally lose it without knowing whether it is possible to recover deleted files, including those on the desktop, and how to do it. There may be quite simple situations where lost documents are literally a couple of clicks away, but there may also be more serious problems that require the use of special applications to solve.
Recovering from the Recycle Bin
All files after deletion while maintaining the standard computer settings fall into the so-called. Recycle Bin is a special folder on the desktop, by opening which you can easily restore any deleted information by highlighting the desired object and selecting the appropriate item in the menu. But files can be deleted permanently without being placed in the trash.
Inexperienced users often accidentally delete application shortcuts and documents from the desktop, believing that if they are gone, then the rest of the program has also been deleted entirely. In this case, many people do not know how to recover deleted files. This is very easy to do, even if the basket is empty. There are two options:
- Roll back the system to the nearest restore point;
- Find the program in the main menu of the Start button and drag the desired shortcuts to the desktop.
The second option is preferable, but if lost programs and documents have disappeared from the list of the main menu on the computer and you do not remember the directory in which they were installed, you will have to use the first.
If you are deciding how to recover a deleted folder from your desktop, and the erroneous action was performed recently, then you probably won’t even have to go to the Recycle Bin. Deletion can be canceled by simultaneously pressing hot Ctrl and Z.
Using a restore point
It is important to understand that rolling back to a previous restore point will not return the program, documents and files if they were deleted. In this way, only erased shortcuts on the desktop can be returned to their place. Here's how it's done using Windows 8 as an example:

A window will open in which, by default, you will be asked to restore to the most recent checkpoint. If necessary, you can specify any other existing restore point.
We use third-party applications
If data and documents from the laptop’s hard drive are completely deleted and cannot be returned using standard OS tools, you will have to use special utilities to recover deleted files. It is important to remember the main rule that increases the chances of successful data recovery - do not write anything to the disk partition that you will be working with later.
Recuva is a simple free utility
The most famous and simple application with which you can recover deleted files is the free Recuva. During installation, select the partition of the disk that does not contain any data to be recovered. The operating principle of Recuva and other similar utilities is approximately the same:

After the scan is completed, the recovery wizard will display on your desktop a list of all the lost documents that it was able to detect. The utility will be able to restore those marked with a green circle without any loss. If the icon color is red, then this file most likely cannot be returned - a recording has already been made over it and most of the data and information about the file are completely lost.

All that remains is to select the files (you can use the corresponding function to search for specific photos and documents), select the directory to save and click “Recover”.
PhotoRec is another functional free utility
The name of the program should not be misleading. The utility recovers not only photos, but also most other types of files. Its advantage is that there is no need for installation - free PhotoRec is downloaded from the office. site in the form of an archive, unpacked, after which you can work with it. This is an important property for such applications - the program can be immediately downloaded to a flash drive and worked with it.

The scheme for returning long-lost information is as follows:
- After launching PhotoRec, the main window immediately opens, in which the drive is selected in the top drop-down menu - you will have to work with it during data recovery. The program also works with img format images created in other applications.
- Below in the window there is a list in which you can select a full disk scan or individual sections.
- Below, you can set the file type to scan by clicking File Format. If you skip this step, the program will try to recover all accidentally deleted data that it can detect.
- You can specify a folder to save the recovered information by clicking the Browse button. In addition, in the File System type menu you will need to select a file system. If you work in a Windows environment, check the second box. Ext 2-4 system is the standard for Linux.
Let's compare the considered applications
For novice users, the PhotoRec program is no less suitable than the above-described Recuva. It is more powerful - it often extracts data from the computer better, but there is still one unpleasant feature. Free PhotoRec does not allow you to view the found files after scanning and select something specific from them. This must be taken into account when working with large hard drives - if you do not specify in advance which files are to be restored, everything will be saved.
Above we discussed the simplest free applications for retrieving accidentally deleted information on the desktop or lost documents after formatting flash drives, hard drives and other media.
It is important that PhotoRec, unlike Recuva, is also a cross-platform utility, i.e., it can work in any operating environment.
Recuva operates only under Windows, starting from the seventh version of the OS. There is also more advanced semi-professional and professional software for retrieving deleted data from any drive. Almost all of them are paid, but the loss of information often costs more. If necessary, you can use the applications R-studio, File Scavenger, Power Data Recovery, Data Rescue PC, etc.
recoverit.ru
How to recover deleted files on your computer
People often come to me asking to recover photos, music, and other files accidentally deleted from their computer. However, this does not always happen by accident, for example, a girl quarreled with a guy, and out of bitterness deleted all the photos with him, and later, having made peace, she clutches her head, “What have I done!” But this is an example; situations in life are different.
Many people think that these files cannot be returned, or you need to contact a specialist who will restore your documents for money. Meanwhile, the file recovery process itself is not that complicated, and following the instructions given in this article, even a novice PC user can handle it.
Recovering deleted files in windows 7, 8.1, 10
First of all, you should look in the trash, if the necessary files are in it, then restoring them is as easy as shelling pears. Just select the desired file and click “Restore selected objects” or “Restore all objects”.

All deleted files always end up in the Recycle Bin and are stored there for some time, unless, of course, you specifically empty the Recycle Bin. If there are no files in the trash, read on.
If the deleted files are no longer in the Recycle Bin, it is still possible to recover them. For this we need a special program Recuva, you can download it from the official website of the developers. There are paid and free versions; the free one is quite sufficient for us.
After downloading, install the program.


At the last step, click “Run Recuva” to start the program.

Now let's move on to file recovery. In the window that opens, select the type of file to be restored, picture, music, video, document, etc., this will significantly speed up the search for the deleted document.

Now select the folder where the file was located before it was deleted; if you don’t remember, leave “Not exactly known.”

Now click “Start” and you can go about your business, the search process is quite long. The speed of the process depends on the size of the hard drive and the specified search parameters.

After finishing the search, just select the files you need and click restore.

This completes the file recovery process, as you can see everything turned out to be very simple.
interscop.ru
How to recover permanently deleted files in Windows?
 Sometimes, for some reason, people accidentally completely delete important documents from their computers. If you have ever encountered this, then today’s article, where I will tell you how to recover permanently deleted files in Windows, will help you. You might be surprised, but even files deleted from the Recycle Bin are not completely removed from your computer and are stored on your hard drive for some time. Therefore, if a little time has passed since the document was deleted, then there is still hope that they can be restored. This cannot be done with improvised means, so I advise you to download the Handy Recovery program at this address: handy recovery and install it on your computer.
 This program is also good because in addition to restoring deleted files, it can also restore files infected as a result of virus attacks. If you want to know more about this, please sign up in the comments form.
To do this, launch the Handy Recovery program, after which it will ask you to select a local disk for analysis. Select the disk on which the deleted document was located and click “Analyze”, after which the program will begin to analyze this disk for the presence of recoverable files.

When the analysis is complete, you will be able to see all the files that can be returned. Select any of them and pay attention to the “recovery probability” tab, where you can see the probability of what the chances are of getting your files back without damaging them. To continue, click the “restore” button.

Next, a window will appear in which, by clicking the “browse” button, you can select the folder where the file will be restored. Now click “OK” and the process will begin. The time it takes to restore a file depends on its size.

After the process is completed, you will find your previously deleted document in the same place from which you deleted it. I would like to add that this program does not guarantee you complete document recovery, and in principle, there are no programs that can guarantee this. But another useful feature is that it can restore deleted Chrome history. That’s all for me! If you have any questions or have something to add to this topic, write in the comments. And with this I say goodbye to you, bye everyone.
www.yrokicompa.ru
Recovering a deleted file or folder
I think many people have had a situation in which you accidentally or someone intentionally deleted a file or folder with very important information. And naturally the question arose - How to recover a deleted file or folder? The first thing you need to do is not to be upset or upset, because almost any information deleted from a computer/laptop, USB drive can be easily recovered by yourself, but for successful recovery you need to understand one rule:
There is no need to write files or install programs on the hard drive or USB flash drive that contains the information you want to recover. This is connected with the principle of deleting information, the fact is that when you click on the “delete” button, the information is not actually deleted, but only its header is erased, the file or folder itself remains, but the next time it is written to a disk or USB, it is replaced in the place where a deleted file or folder is located, new information is written, the old one can no longer be restored.
Ways to recover a deleted file or folder.
1) Check cart
The first and simplest thing to do is check the Recycle Bin to see if there is a deleted file or folder there. To do this, click on the Recycle Bin shortcut on the desktop and if you see a file or folder there that you accidentally deleted, right-click on it and select “Restore”. The data will be restored to the same location where it was before it was deleted.

If you are unlucky and you do not find the deleted file or folder in the trash, then you need to use one of the recovery programs described below
2) Use the free data recovery program Recuva.
First of all, go to the Recuva website and download the latest version of the program. Then you start installing the downloaded program, the installation process is very simple, the first step is to select the installation language.

Then we specify additional parameters (whether to create a shortcut on the desktop, whether to search for program updates...), you can leave them as default. Please note that if the deleted file was located on the disk where the operating system is installed (often drive C), then the Recuva program should not be installed on this disk, otherwise by installing it you may overwrite the file and it will not be possible to recover it. To select a different drive for installing the program, click the "Advanced" button and specify a different path for installing the program.

After this, you will be prompted to install the Google Chrome browser; if you do not want to install, uncheck the box.

After installation, the Recuva wizard will launch to help you recover your files or folder. I strongly recommend using the wizard, as it is more understandable and convenient. Click "Next"

Selecting the type of recovered file

Select the location where the file or folder was located.

Check the box "Enable in-depth analysis" and click "Start".

After this, the search for files will begin, this can take up to several tens of minutes, depending on many factors (computer power, disk or USB device capacity, disk speed, USB device, etc.).
After searching, you will see a list of files that can be recovered. If you want to get more detailed information about the files, you can click on the "Go to advanced mode" button.

To restore a file, check the boxes next to them and click the "Restore" button, then indicate where to restore the file and within a few seconds the file will be restored. 
3) Using the paid program EasyRecovery.
I, like many, am for free software, but in this article I will describe file recovery using a paid program, since during my test recoveries this program saw more deleted files than Recuva (2385 files versus 2461). I would recommend using this program if the free one did not help. You will still not lose anything, since with this program you can find deleted files for free, but to restore these found files and folders you will need a license key.
So, first of all, download the latest version of the EasyRecovery program (in this example I will use the Home version). Let's install... the process is not complicated, we agree with everything and click "Next", let me remind you that the program must be installed on the volume (disk) from which you will not restore the file or folders, since you can overwrite the file or folder being restored. After installation, run the program, the first window to appear is the licensing window, which you can skip if you click “Run as a DEMO”. The first EasyRecovery window appears in front of us, click “Continue”.

In the next window, select the location where the file that needs to be restored is located.

The next step is to select a recovery scenario. If the file or folder was simply deleted, it is recommended to select "Deleted File Recovery", if the hard drive/USB flash drive was formatted, you must select "Formatted Media Recovery".

After this, an information window will appear in which all the specified search settings are indicated; if you have not confused anything, click “Continue”.

The search for files will begin, this process may take quite a lot of time, depending on the volume size of the hard drive or USB device, the power of the computer, etc. After the entire disk or USB flash drive is scanned, all deleted files will appear in front of you, divided into groups depending from expansion. If you click on a file and try to open the file (Open) or save it (Save as), you will be prompted to enter a license key; without it, the file will not be restored.
I hope this step-by-step guide helped you recover your files and folders, saving a lot of time and possibly money. In the future, I recommend using backup of important files, if possible, store important files on several media or at least in different folders.
pk-help.com
How to recover deleted files and data from a computer Windows 7, 8, 10, recovery programs, recover data after formatting
The first thing you need to do if you need to restore a file is to run a search in all subfolders of all disks, and also simply look in the Recycle Bin. There is a possibility that the data was not deleted, and you simply do not remember its location, or it was deleted using the Del key followed by confirmation, which in essence is also not deletion, but only moving to a system container called “Trash”. Restoring it will be easy, unless of course you have emptied the Recycle Bin before. If the file you are looking for is there, you can easily find it by sorting it by date of deletion. Right-click on its icon and select Restore.
Pay attention to the column in the Recycle Bin Original location - this is the path where the recovered file will end up.
In addition, if you are a user of any cloud synchronization service (for example, Google Drive or DropBox), we recommend that you look in the cloud storage trash.
We use third-party utilities
If the required file was not found as described above, the recycle bin was emptied, or a complete deletion was performed using the “Shift+Del” combination or special software. In this case, you should resort to the help of one of the many third-party utilities. They will help if during the time that has passed since the deletion, no data has been written to the disk that previously stored this file.
Hetman Partition Recovery
With this program you can recover files of any type. A high-quality low-level search algorithm will allow you to recover the maximum amount of data even in the most complex cases when file tables are empty or missing. Restoration occurs based on start and end signatures. You can regenerate data not only from a hard drive, but also from any removable storage device.
Cleaning the WinSxS folder in windows
The procedure is as follows: select the logical drive or removable media from which the document was most likely deleted.
A window will appear with a choice of analysis - quick and complete. The difference is serious. A quick one will take place in just a few moments - it will produce few results, a full analysis will work more efficiently and deeply. The entire surface of the disk will be carefully scanned and you will be given the most complete information. Having selected the type of analysis, click “Next”.
Having completed the process, the utility will return the disk structure by marking the recovered files with a red cross in the place from which they were deleted.
Mark the documents that require recovery and click “Recover”. Before saving, you can view the contents of any file.
EaseUS Data Recovery Wizard
Immediately about the shortcomings of the utility - it is paid, the free version allows you to recover no more than 2 GB. Secondly, you cannot create a bootable recovery disk using it. In the English version, the main menu of the program looks like this. 
As you can see, everything is quite simple. Three icons: Recover deleted files, Full, Partial (partitioned) recovery. By selecting Complete Recovery in the next window, check the file types to search. 
Click Next - select the drive and Next again. 
After waiting for the Searching procedure to complete, the names and sizes of the files will be displayed in Explorer; to restore, select the ones you need and click “Recover.” Specify another drive where you want to save the information.
The results of the work are encouraging - most of the files were recovered. 
CardRecovery
This small-sized free utility specializes more in flash drives and SD cards. It works quickly and very efficiently. 
Ways to format a flash drive on MacOS
The interface is in English, but simple and intuitive. We specify the removable media, click Recover and wait for the scan results.
Recuva
Probably one of the most famous and recommended programs for these purposes. We will recommend her too. It is completely free. A high-quality simple Russian-language interface is available here. 
The place from where we will restore or mark the item It is not known exactly - and again “Next”. 
A list of found documents will open, mark the required ones with a checkmark and click the “Recover” button. 
You can view the data by first switching to advanced mode. 
The main thing is not to restore data to the place where it was lost; use another disk or media for this.
Recuva is available not only for a computer, it can also be successfully used on a smartphone (Android).
Photorescue
This utility is designed to return lost photos from SD cards and flash drives. 
By running the utility as administrator, select the physical disk. During scanning, the program will ask for some parameters (intervals, cluster size). You can leave it as default. Once the scan is complete, you will see the results, where you can select files and save to your computer.
